Overview
2 softwares to run Trojan:
- Trojan client : https://github.com/trojan-gfw/trojan
- Qv2ray : https://github.com/Qv2ray/Qv2ray
trojan, vpn and ssr 的区别
TODO
Trojan
Install trojan client on Ubuntu
For 18.10 & 19.04
sudo add-apt-repository ppa:greaterfire/trojan
sudo apt-get update
sudo apt-get install trojan
For >= 19.04
sudo apt-get install trojan
On Manjaro:
sudo pacman -S trojan
Reference: Binary & Package Distributions · trojan-gfw/trojan Wiki
Trojan client config
Put config.json under /etc/trojan/config.json (for Arch) 或者 /usr/local/trojan/config.json (for Ubuntu)
sudo mv /etc/trojan/config.json /etc/trojan/config.json.backup
sudo vi /etc/trojan/config.json
To test that trojan is working, run the one-time command:
/usr/local/trojan/trojan -c /usr/local/trojan/config.json
Run on system daemon
Simply, enable trojan:
systemctl enable trojan
systemctl start trojan
If trojan service isn’t available:
cd /etc/systemd/system/
sudo vi trojan.service
Input:
[Unit]
Description=trojan
Documentation=man:trojan(1) https://trojan-gfw.github.io/trojan/config https://trojan-gfw.github.io/trojan/
After=network.target

[Service]
Type=simple
StandardError=journal
User=nobody
AmbientCapabilities=CAP_NET_BIND_SERVICE
ExecStart=/usr/local/trojan/trojan -c /usr/local/trojan/config.json
ExecReload=/bin/kill -HUP $MAINPID
Restart=on-failure
RestartSec=3s

[Install]
WantedBy=multi-user.target
Then add to auto-run and config system-wide alias:
systemctl enable trojan
Optionally, add alias for quick run:
sudo vi ~/.bashrc
# add the following line:
alias trojan='/usr/local/trojan/trojan -c /usr/local/trojan/config.json'
Above, configed trojan successfully on system level. Welcome to beyound the wall.
Browser config
Next step, download SwitchyOmega for Chrome and Firefox, config SOCKS5
Download url: https://github.com/FelisCatus/SwitchyOmega/releases
Local file:
- https://mar2ndx.github.io/files/proxy_switchyomega-2.5.20-an+fx.xpi
- https://mar2ndx.github.io/files/SwitchyOmega_Chromium.crx
Go to switchyomega config and set (default) to “SOCKS5” protocol and “127.0.0.1” server, “1080” port.
Done!
Known Issue
If you see “unknown protocol” error, then you have mis-configed http instead of socks5.
Qv2ray
Qv2ray仅需下载以下三件套:
Trojan plugin: https://github.com/Qv2ray/QvPlugin-Trojan/releases/tag/v3.0.0-pre3
- 注意:trojan plugin 和 qv2ray 版本必须对应
v2core: https://github.com/v2fly/v2ray-core/releases
- 或者 https://github.com/v2ray/v2ray-core/releases
- 注意选择:v2ray-linux-64.zip
After installation
Troubleshoot
Check IP address
curl ifconfig.me
Test VPN
Test whether proxy / trojan really works
curl google.com
echo $https_proxy
Use another machine as proxy
假如 somehow 你的机器无法 config proxy,你可以使用另一台机器:
- 在公用机器上 Config Qv2ray: 监听地址 = 0.0.0.0
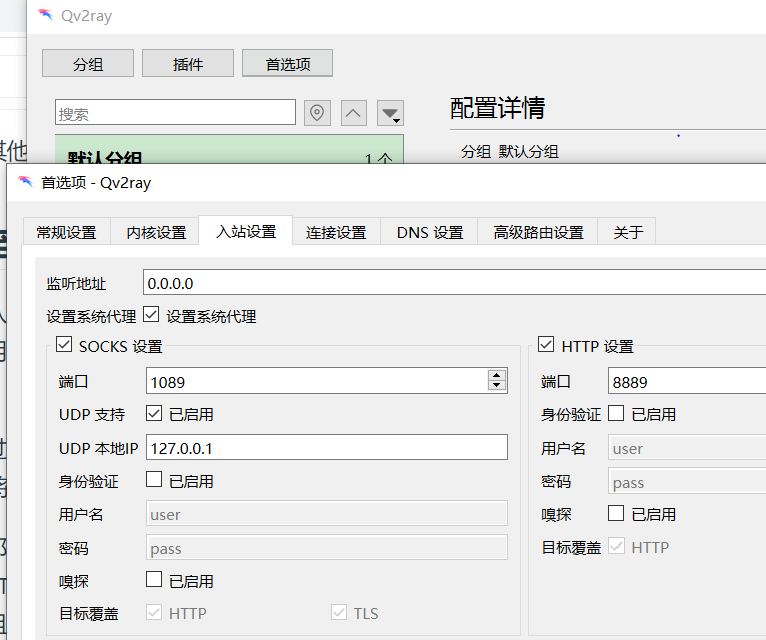
在私人机器上 Set manual proxy:
Proxy: (公用机器的地址,比如 192.168.31.105)
Port: 8889
Terminal proxy
对于 Qv2ray:
export http_proxy=http://127.0.0.1:8889
export https_proxy=http://127.0.0.1:8889
或者:
export http_proxy=http://127.0.0.1:8889
export https_proxy=socks5://127.0.0.1:1089
然后加入 alias:
sudo vi ~/.bashrc
Content:
alias fanqiang='export http_proxy=http://127.0.0.1:8889 && export https_proxy=socks5://127.0.0.1:1089'