Overview
GalliumOS is built solely for Chromebooks.
这个 Linux 系统是基于 Ubuntu 18.04 (bionic) 的。
GalliumOS Basics 系统配置
用户权限
Give yourself ‘su’ previlege!
在 Users Settings 中,把 Account Type 改为 Administrator.
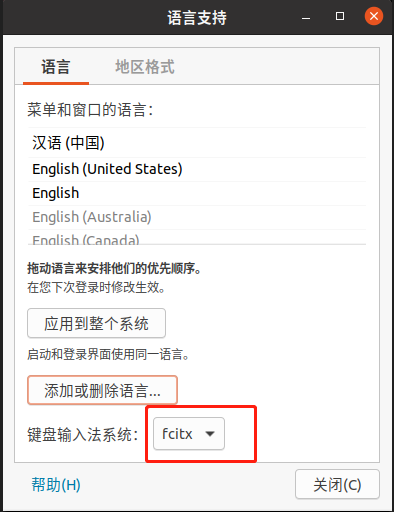
不换源的话,language 和 fcitx 安装会出问题。

HiDPI
Most simply way: Go to Settings Manager > Appearance > Fonts > Custom DPI setting and change from 96 to:
- 144 in you are on external (1080p) display
- 192 if you are on 2K laptop screen
There is a script to automate this process, I made it simple by hosting a copy here
sh fix-hidpi-in-galliumos-3.1.sh
Next, change the right bottom battery icon:
vi ~/.config/gtk-3.0/gtk.css
File content:
#xfce4-power-manager-plugin * {
    -gtk-icon-transform: scale(0.38);
}
However, based on my experience, changing /etc/profile.d/gdkscale.sh doesn’t work very properly.
Update March 30, 2022
I found there is additional issues with scaling. Thus this is my conclusion:
- 如果是双屏幕,dpi不同,最好的办法就是改分辨率,反正笔记本屏幕也不是主力屏。
(我将 CB713-1W 的屏幕改成 1400 x 900 ,配合 1080p 的外显使用) - 其实样式可以直接到 Appearance->Fonts 里面,DPI 改成 96 或者 144
- 去 Window Manager 里,可改窗口样式。
- for more:https://v1.marksolters.com/programming/2016/05/13/pixel-gallium.html
声音
看了很多 Kaby Lake 如何 fix audio 的帖子:
- https://www.reddit.com/r/chrultrabook/comments/r6v4j2/audio_on_kaby_lake_device_acer_chromebook_13_cb713/
- https://www.reddit.com/r/GalliumOS/comments/gk5bpg/no_sound_with_galliumos_31_kabylake_14da0011dx/
- https://github.com/GalliumOS/galliumos-distro/issues/536
最终决定:直接用外接显示器上的声卡吧!
(可插耳机)
换源 Change source
cd /etc/apt/
vi sources.list
The aliyun source:
deb http://mirrors.aliyun.com/ubuntu/ bionic main restricted universe multiverse
deb-src http://mirrors.aliyun.com/ubuntu/ bionic main restricted universe multiverse

deb http://mirrors.aliyun.com/ubuntu/ bionic-security main restricted universe multiverse
deb-src http://mirrors.aliyun.com/ubuntu/ bionic-security main restricted universe multiverse

deb http://mirrors.aliyun.com/ubuntu/ bionic-updates main restricted universe multiverse
deb-src http://mirrors.aliyun.com/ubuntu/ bionic-updates main restricted universe multiverse

deb http://mirrors.aliyun.com/ubuntu/ bionic-proposed main restricted universe multiverse
deb-src http://mirrors.aliyun.com/ubuntu/ bionic-proposed main restricted universe multiverse

deb http://mirrors.aliyun.com/ubuntu/ bionic-backports main restricted universe multiverse
deb-src http://mirrors.aliyun.com/ubuntu/ bionic-backports main restricted universe multiverse
输入法:fcitx
首先,下载搜狗:
https://pinyin.sogou.com/linux/
Go to “Language Support” 或者“语言支持”,添加“中文”,并且把输入法设置成:fcitx。
然后:
sudo dpkg -i sogoupinyin_2.4.0.3469_amd64.deb
如果缺依赖,就:
sudo apt -f install
这时候仍然可能会失败,报以下错:installing sogoupinyin would break fcitx-ui-qimpanel。这个原因是搜狗拼音安装包中含有fcitx-ui-qimpanel,与系统已有的fcitx-ui-qimpanel产生了冲突,所以,删除 fcitx-ui-qimpanel。
sudo apt-get remove fcitx-ui-qimpanel
后来,再安装sogou,或者先安sogou后安locale包,再重启机器,总之就好了。版本号:搜狗个人版 4.0.0.1605 (2022年3月)。
Install Software
Chrome, VSCode
Just download and install:
Install MySQL Workbench
Workbench 最近版是 Workbench 8.0.28,但是不支持 bionic。
故选择mysql-workbench-community_8.0.22-1ubuntu18.04_amd64.deb
先安依赖:
sudo apt install libzip4
sudo dpkg -i mysql-workbench-community_8.0.22-1ubuntu18.04_amd64.deb
就好了。
Spotify
According to the official tutorial:
curl -sS https://download.spotify.com/debian/pubkey_5E3C45D7B312C643.gpg | sudo apt-key add -
echo "deb http://repository.spotify.com stable non-free" | sudo tee /etc/apt/sources.list.d/spotify.list
Then you can install the Spotify client:
sudo apt-get update && sudo apt-get install spotify-client
spotify